Lifestyle

5 CHAMPAGNE COCKTAILS TO TOAST TO

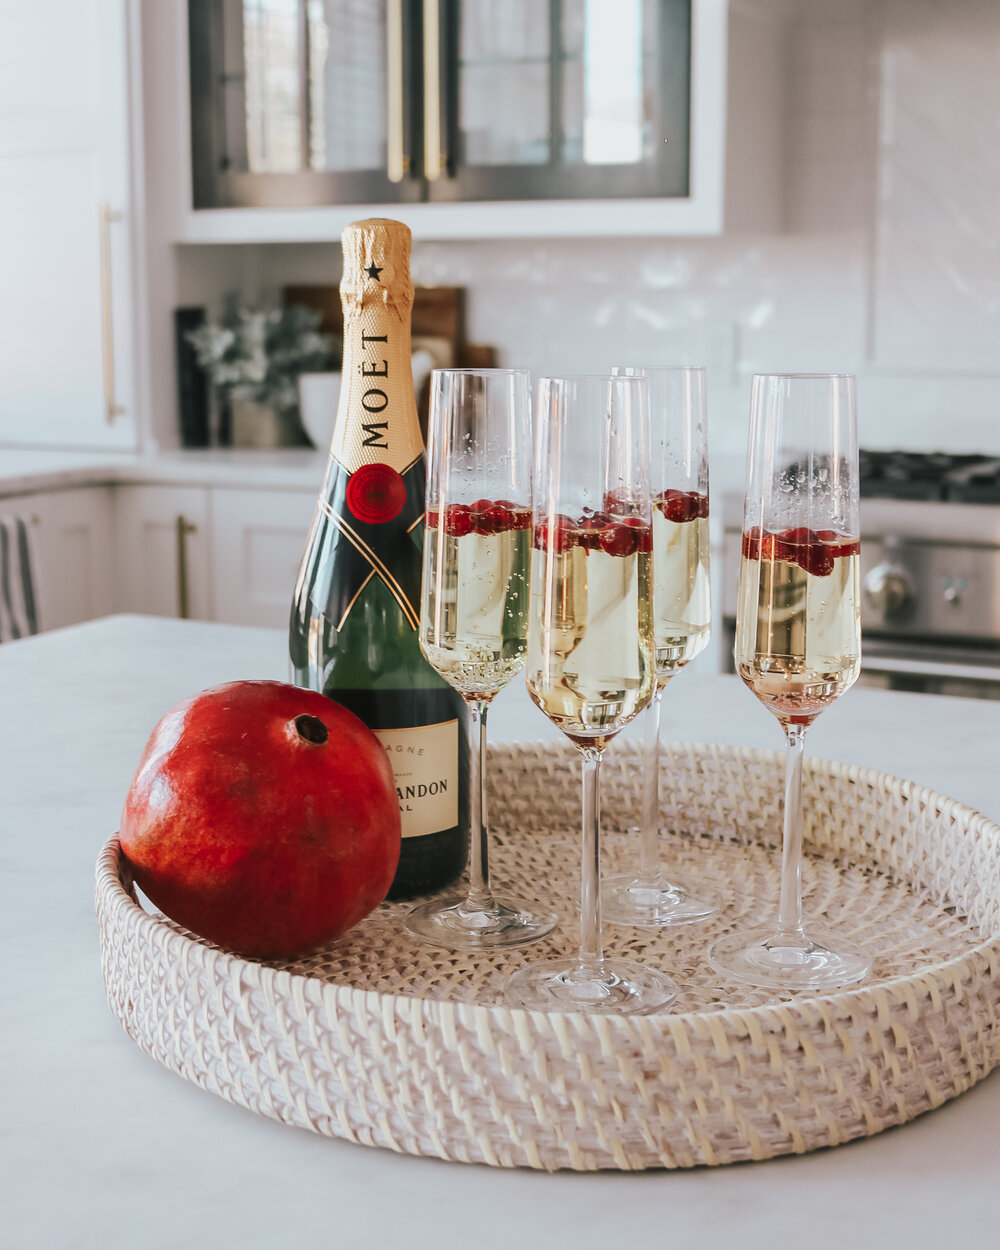
We’re almost to the New Year which means everyone’s about to pop a whole lot of bubbly! But if you really want to wow everyone, check out these fun champagne cocktails that won’t only taste good, but will look super festive and beautiful too!!


IMG_8279.jpg


BLOOD ORANGE CHAMPAGNE MULE

from Half Baked Harvest

  • juice of 1/2 a medium blood orange

  • juice of 1/2 a lime

  • 1 oz. vodka

  • 8 mint leaves

  • 2 oz. ginger beer

  • chilled champagne to top it off!

    garnish with blood orange slices and mint


PEAR + CRANBERRY CHAMPAGNE COCKTAIL

from Minimalist Baker

  • 1 1/2 cup cranberries

  • 1/2 medium ripe pear, peeled and chopped

  • 2 tsp orange zest

  • 2 tbsp water

  • 2 tbsp maple syrup

  • 1 750 ml bottle sightly dry champagne

Bake the cranberries, pear, orange zest water and syrup at 400 degrees for 20 – 22 minutes. Transfer to food processor and mix on high until compote reaches desired consistency. If you want it to be thinner, work it through a fine mesh strainer.

Chill for about 30 minutes.

To serve, add 2 tbsp of compote into serving glass then top with champagne and use a spoon to stir/blend the two. Top with fresh cranberries if you’d like!


RASPBERRY MIMOSA

from Spend With Pennies

  • 1 tbsp clear corn syrup or honey

  • 1 tablespoon coarse sugar

  • 6 oz pomegranate juice, frozen into ice cubes

  • 2 oz raspberry liqueur

  • 8-10 oz sparkling wine

rub the rims of the glass with thin layer of syrup/honey then dip into sugar


FRENCH 75

from Gimme Some Oven

  • 1.5 oz gin

  • 1 oz lemon juice

  • 1/2 oz simple syrup

  • 2 oz chilled champagne

    lemon twist for garnish


SPARKLING POMEGRANATE PUNCH

from Half Baked Harvest

  • 2 cup pomegranate juice

  • 1 1/2 cup orange juice

  • 2 12 oz. bottles of apple cider

  • juice from 1 lemon

  • 1 750 ml bottle champagne

  • arils from pomegranate

  • 12 rosemary sprigs

  • 1 cup granulated sugar

Use the pomegranate arils in the drink for garnish. Run the rosemary until water gently to dampen them, then sprinkle with sugar on all sides, then allow to dry for 1 hour (can be made 1 day in advance). Use for garnish


Photo Oct 05, 2 57 27 PM 2.36.57 PM.png


Health & Fitness

APPLE SNACK BARS

Let the apple endeavors continue!

A few years ago when I went to the apple orchard and loaded up, I ended up making 4 loaves of apple bread. Yup, excessive. So I decided this year I would find different, more creative ways to use the apples! Not that I don’t love apple bread… because I do. Like, a lot. But, time to evolve!


IMG_1244-2.jpg


Last week I shared the recipe for my apple protein pancakes and I have had great feedback from people saying they tried them and love the seasonal side of breakfast! Now, it’s time for some snacks.

What I love about these bars is the chunks of apples. Almost like banana bread where you get that little chunk of fruit, so you know it’s healthy 🙂 And these bars really are! I added even more healthy alternatives to the already-healthy recipe at the very bottom. Want to add a little protein? Take out a little sugar? Make it vegan? All options are at the very bottom!

While these don’t have a ton of protein, they are low in sugar! Yes, less sugar than 1 medium banana. So if you don’t want to change the taste of these yummers but still want to add some protein to the snack? Maybe warm up the square and top it with some vanilla Siggi’s Yogurt. Wow, my mouth is watering…. be right back.


IMG_1248-2.jpg


If you don’t like the apple chunks in these bars (first off, you’re crazy), but you could shred the apple instead of chopping it! Now, that adds a little more moisture because of the way the juices from the apple come out when it’s shredded, so if you decide to shred your apple, maybe wait to add the honey. You might need less to get the batter to the moist level that it needs to be to bake appropriately. But definitely try it out!

Other add-in options that I think would be really good; Slivered almonds, raisins, chopped walnuts. Make it your own!! Either way these are great gluten free snacks to have for you, and even your kids for the week!


THE RECIPE


Makes 16 bars

1 1/2 cup gluten free rolled oats

1 cup almond flour/meal

1/3 cup unsweetened shredded coconut

1 tsp baking soda

1/2 tsp salt

2 tsp ground cinnamon

optional spices: nutmeg, ginger

1/4 cup olive oil

1/4 cup almond butter, or nut butter of choice

1/4 cup date sugar, or sugar of choice

1/4 cup brown rice syrup, or honey

1 egg

1 tsp vanilla extract

1 apple, peeled and chopped


Preheat the oven to 350 degrees and line an 8×8 pan with parchment paper.

While oven is preheating, in a small bowl mix the dry ingredients together: oats, almond flour, shredded coconut, baking soda, salt, and spices.

In a medium bowl, mis the wet ingredients together until almost a creamy consistency: almond butter, olive oil, date sugar, honey, vanilla extract. Once that is all mixed, at that point add in the egg and mix, as to not overheat the yolk.

Meanwhile, peel and chop your apple and set aside. After you have folded the dry ingredients into the dry ingredients and thoroughly mixed, add the apple. Once the entire batter is mixed, which should be fairly thick and dry, not too wet, pour it into your prepared parchment-covered 8×8 pan.

At this point, I wet my hand and pressed the mixture down firmly and evened out the top to make it one even square.

Bake for 18-22 minutes, then remove from oven to let cool for about an hour. This is CRUCIAL! Otherwise when you try to take the mixture out of the pan it will just crumble apart.

Once you have waited the hour, carefully remove the bar out of the pan by the parchment, then proceed to cut into 16 individual snack bars.


NutritionLabel.png


Want to make it a little healthier and leaner? Here are some substitution ideas!

Instead of 1 cup of almond meal:

1/2 cup almond meal

1/2 cup vanilla whey protein powder

Instead of 1/4 cup of honey:

2 tbsp of almond milk, or enough to reach the same desired consistency of batter.

Want to make it vegan?

Replace the egg with 1 tbsp chia seeds soaked in 3 tbsp water.

By making these two changes, you alter the nutrition to result in the below. Notice the change in protein and sugar. But keep in mind this will change the consistency and overall taste of the recipe


NutritionLabel-2.png


IMG_1238.jpg


Lifestyle

PAIRING ROSÉ + APPLES

Who said rosé is just a summer wine?


IMG_0699.jpg


While I totally get it, and in fact even agreed with the summertime presence with this wine, after I tried it with a few of these recipe ideas? I actually prefer it this time of year! While I wouldn’t say this is the perfect wine for, say, November or maybe when there is snow on the ground, this transitional season between summer and fall is the perfect time to mix the two!

Favorite part of fall? The fresh apples!

The light airiness, hint of berries and florals pairs perfectly with sweet and tart apples! And until I tried them together? Oh my gosh! It’s kinda like champagne and strawberries, the beauty of one brings out the beauty of the other. So, I should pop open a bottle and eat some apple slices? Let’s get a little more creative.


pairing rosé with apples.jpg


The picture above is my favorite: cheese and crackers. I’m a snacker, I love snacks! So cheese and crackers is a constant in my house. But want to fancy it up? Grab some Manchego, and a jar of apple jelly. Want to get REALLY fancy? What about some homemade apple jelly? If you have bags full of apples from your trip to the orchard this weekend? Then, I say go for it! But if you’re having some friends over or if you are entertaining soon, this is the perfect finger food to set out to up your hosting game.

Have a sweet tooth? Making your apples into a light palette cleanser or dessert is a great use of this sweet and tart fruit! Like a apple granita or a spiced apple cider sorbet are a great dessert pairing with your glass of rosé. The acidity of the lemon juice and apple cider in the sorbet are a great compliment to the acidity in the rosé.

Want to try a sparkling rosé? The bubbles and increased acidity in the sparkling rosé allows for a bit heavier of a pairing, if you prefer! Maybe an apple chutney, or… ready for it? Apple Baked Brie? Well, you had me at “rosé”, then “baked”, then “brie”. But if the heaviness of the bake brie is too much, maybe in a different form? I LOVE this recipe for a Brie, Apple and Honey Crostini . Again, a great way to up your hosting and finger-food game, while keeping the pairing complimentary to your sparkling rosé.

Again, those are heavier options, and while all delicious, if you really want to pair it well with a rosé, I would go for a lighter, sparkling one. Almost the fruitier the better. Especially with the baked brie, as the heaviness of the brie may take over the sweetness of the apples. So let your wine take over and help out!


TO SERVE


IMG_0703.jpg


Health & Fitness

APPLE PROTEIN PANCAKES

Pretty sure I have said this before, I would eat breakfast every meal of the day.

And sometimes…. I do.

Don’t judge. You know it’s delicious.


IMG_0736.jpg


But sometimes the breakfast options aren’t quite up to snuff nutritionally. Which is why I love finding healthier ways to enjoy this delightful meal. Whether it’s pancakes, waffles, a parfait, they don’t have to be unhealthy! The biggest culprit of most of these dishes is the sugar.

Most of iHop’s pancake servings have up to 40 even 50 g of sugar!!!! That is almost double the sugar that you should have in an entire day… in one sitting… on one plate… oh my. When you put that much sugar with so little protein? Well, it’s a recipe for disaster on anyone’s health.


IMG_0719.jpg


These pancakes have more protein than sugar, and the natural sweetness from the apples is not only perfect for this time of year, but also a great way to get some great taste without the added enemy. With that, it is really important to get unsweetened applesauce, if you don’t, that definitely kicks up the sugar content. Just compare the two jars next time you are in the grocery store, the difference is… noticeable.

I used Tera’s Whey Vanilla Protein Powder that you can find in most grocery stores, and Whole Foods. The taste is so subtle that it doesn’t take over the entire meal. If you have a protein powder that you prefer, go right ahead! Just know it may change the taste a bit.


IMG_0738.jpg


THE RECIPE


Serves 3 | about 8 small pancakes

1 medium apple peeled, sliced

  • ¾ tsp. ground cinnamon divided use

  • 4 large egg whites (½ cup)

  • ½ cup unsweetened applesauce

  • ¼ cup unsweetened almond milk

  • 1-2 scoops whey protein powder vanilla flavor

  • ¼ cup old-fashioned rolled oats

  • 6 Tbsp. oat flour

  • ½ tsp. baking powder

  • ½ tsp. ground cinnamon

  • ½ tsp. ground ginger (optional)

  • 1 dash ground nutmeg (optional)

Thinly slice the peeled apple and mix/coat with as much ground cinnamon as you want, then cook in a small skillet until the slices are cooked through thoroughly. This should take a few minutes, but make sure not to overcook or burn! Once they are done, set aside as your topping.

Meanwhile, mix the egg whites, applesauce, and almond milk in a small bowl together. Then mix the protein powder, rolled oats, oat flour, baking powder, and cinnamon in a medium bowl. Then slowly pour the wet ingredients into the dry and mix together. Careful not to over beat or beat too hard as the egg whites could change the consistency of the pancake.

I used a cast iron flat skillet to cook my pancakes, but once your pan-of-choice is coated with cooking spray, and heated slightly stove-top, begin to pour the batter. (*note: I tend to heat my pan on medium, then just before pouring the batter turn it down just a tad as not to burn the edges on contact) I tend not to go off of time, but notice the bubbles in the batter, once the outside or a generous portion of the batter has bubbles in it, then it’s ready to flip!

Stack your pancakes, top with cooked apple slices and maple syrup of choice. (*note: the nutrition facts below do not account for the maple syrup, which, obviously, changes the sugar content. My suggestion? sugar free maple syrup! Yes, it’s a thing, and yes it gives just the hint of maple that I need to complete my healthy breakfast.)

I cooked one pancake a time to cook them all evenly, and made 8 small pancakes. But if you choose, 4 medium ones would make for a perfect 2-serving meal.


NutritionLabel.png


IMG_0723.jpg


Health & Fitness

BANANA DARK CHOCOLATE MUFFINS

If you’ve read any of my posts before, y’all know I love banana bread. 

And any reason to make an enjoyable recipe healthier! 


IMG_9852.jpg


If you liked this recipe for clean banana bread, then you’re going to LOVE this one. I have already made a ton! And my husband loves them too which is great because when he gets hungry, hangry is not far behind. 

These are great because they are nice and moist, not overly sweet, and nice and filling!! I have had several this week 🙂 okay… all of them :-O 


BANANA DARK CHOCOLATE MUFFINS

Serves // 12 muffins 

3 ripe bananas, mashed 

1/3 cup almond milk 

1/4 cup maple syrup

1/4 cup applesauce, unsweetened

1/3 cup coconut oil, melted 

1 tbsp vanilla extract 

1 egg

1 3/4 cups whole wheat flour 

1/4 cup protein powder

2 tsp baking powder

1/4 tsp salt 

1 cup dark chocolate chunks 

Turn your oven on to 350 degrees F to preheat. 

In a small bowl mix the mashed bananas, maple syrup, almond milk, applesauce, and vanilla extract until completely combined. Mix in the egg last to ensure it isn’t over mixed.

In a large bowl combine the flour, baking powder, and salt. Slowly stir in the wet ingredients, and once they are almost completely combined, begin to fold in the chocolate chunks and melted coconut oil. I do this last because coconut oil when added quickly to cold items can quickly harden, becoming chunky. So by adding it (while stirring) it helps prevent that right off the bat! 

After you have sprayed the muffin pan(s) with non-stick spray, evenly spoon dough into each of the muffin wells. If your pan is on the smaller size, you may want to make more muffins. If the dough fills the wells too much then your muffins may bake out of the pan and unevenly. 

Bake at 350 for about 18 – 20 minutes, or until the tops are lightly browned and you can insert a knife and it comes out clean.  

Nutrition info below for one muffin, if you want less sugar, maybe take out the maple syrup and use all applesauce! Or, get an low sugar maple syrup, they do exist! 


NutritionLabel-2.png


Health & Fitness

CLEAN PROTEIN BANANA BREAD

Quick breads have always been in my baking routine. 

My mom made the best banana bread, and believe it or not? Even BETTER apple bread! When she came to visit me in Spain, the first thing she did off the plane was give me a loaf of her apple bread. Pretty sure I started crying… 

Now, 9 years later, I am still a sucker for these treats. But yes, I know that they’re not very healthy. Alas! They can be 🙂 


protein banana bread recipe.jpg


I absolutely love turning some of my favorite indulgences into healthy snacks! It’s just another way that you can maintain your healthy lifestyle without depriving yourself. And yes, these have gluten. I know, I know.. that’s a “bad word” these days. But without getting into my diatribe about how annoying this obsession with gluten is, I’ll keep it short. Gluten is not what is unhealthy! It’s the pasta’s, processed breads, unhealthy snacks made with the unhealthy form of gluten that is stripped of its nutrients. But using whole wheat flour is a great option! 

Prefer this to be vegan? Feel free to use flax eggs! Another great option. 

I love both versions of this banana bread. Now, there is NOTHING wrong with the original. Boo, you are enough! But I wanted to utilize the great flavors of the EBOOST Protein Powders to my advantage, and see how we might mix it up a bit! The good thing is, the flavors are pretty subtle in these recipes, but both versions are amazing. 


eboost peanut butter banana bread.jpg


As nutrients go, it is a great balance of protein, carbs, and low in sugar compared some other quick breads you see out there. That slice you see at Starbucks? 420 calories!!! only 6 grams of protein and what’s worse? 31 g of SUGAR!! Please, promise me you’ll never at that. 

Don’t get me wrong, I love Starbucks. They have gotten me through some rough mornings 😉 But when it comes to the food, we could make better choices! Like these recipes! 

Now, my recipes? Scroll down to see the nutrition facts for each version, then you tell me which one you’d rather eat 😉 


eboost protein chocolate banana bread.jpg


PEANUT BUTTER BANANA BREAD

2 large eggs

1/2 cup (115 g) vanilla Siggi’s 0% yogurt

2 medium-size, ripe bananas, mashed (200 g or 1 cup)

4 tbsp agave

3 tbsp creamy peanut butter

1 tsp vanilla extract

3/4 cup (60 g) quick oats

1 tsp baking soda

1/2 tsp ground cinnamon

1 1/4 cup (150 g) white whole wheat flour

1/3 cup Eboost Vanilla PRIME Protein Powder

1/3 cup chopped walnuts 


CHOCOLATE BANANA BREAD

2 large eggs

1/2 cup vanilla Siggi’s 0% yogurt

2 medium-size, ripe bananas, mashed (about 1 cup)

2 tbsp agave

1 tsp vanilla extract

3/4 cup quick oats

1 tsp baking soda

1/2 tsp ground cinnamon

1 1/4 cup white whole wheat flour

1/3 cup Eboost chocolate PRIME Protein Powder

1/4+ almond or soy milk 

1/3 cup dark chocolate or carob chunks


Preheat your oven to 350 degrees F. Prep your bread loaf pan, and get to mixing! 

Whisk the eggs, yogurt, bananas, agave, and vanilla extract (peanut butter, if doing recipe #1) together until blended well. Add the quick oats, baking soda, ground cinnamon and mix until almost completely mixed together. Add in the flour, protein powder and walnuts/chocolate chunks and mix until completely blended together.

At this point it may be a little dry or thick. Now is when you add in the almond or soy milk. This is purely for moisture, so start with 1/4 cup and if it still seems too thick, add 1 tbsp at a time more until you get your desired consistency. It should be on the thick(er) side, so be careful not to add too much and get pancake batter! 

Pour the dough into the loaf pan, and bake for 35 – 40 minutes or until the top has browned and a knife comes out of the bread completely clean! I covered mine with foil about halfway through so they didn’t burn, then uncovered for about the last 5 minutes or so

These are the BEST warm, so either enjoy right away or toast them later on 😀 


clean protein banana bread recipe.jpg


PEANUT BUTTER BANANA BREAD


NutritionLabel.png

CHOCOLATE BANANA BREAD 


NutritionLabel-2.png


Health & Fitness

CINNAMON PROTEIN BITES

I always prioritize protein in my snacks


IMG_8212.jpg


Mostly, when looking at the nutritional value I look at the ratio of protein to sugar. If the sugar is higher than the protein, and significantly, then it’s an automatic no-go. Turns out finding the right ratio at the grocery store is pretty difficult! So, I tend to make my snacks at home. 

I first started making my own granola bars in college. Like, ALL the time, and came to prefer the taste and “control” over that than buying them from the store. All of those “healthy” breakfast bars, granola bars, or snacks really aren’t! Check the ingredients! Rarely can you find some with whole ingredients, and as little sugar as possible. Not to mention ones with healthy protein! 

Okay, I sound high maintenance. 


IMG_8180.jpg


But I feel like that isn’t a lot to ask! Yet, I still insist on making my snacks at home. I’ll be sharing some homemade protein bars, granola, and other healthy snacks you can make from home soon. But today I’m sharing my favorite protein bites recipe. They taste great and perfect for just a little snack if all you need is 1-2 bites to get you through. 

It’s also a super versatile recipe! You can change out or add other ingredients to change the taste. Maybe lemon poppyseed for summer? Hmmm… stay tuned 🙂 


IMG_8215.jpg


CINNAMON-DATE PROTEIN BITES

Serves: 20 – 24 bites

1/4 cup vanilla protein powder 

3/4 cup old fashioned oats 

1/2 cup almond meal

1 tbsp ground cinnamon

5 medjool dates, pitted

1/3 cup creamy peanut butter 

1/4 cup agave syrup or honey

1/2 teaspoon vanilla extract


Put all of the dry ingredients into a food processor, blend until creates a flour-like consistency. If you want it to be a little chewier, feel free to leave the oats a little less blended. Totally your preference 

Add in the dates, peanut butter, honey and extract and process until the wet and dry ingredients mix completely. The mixture will start to mold into a bit of a ball as it spins in the food processor, that means that it is mixed well and everything is holding together. That’s what you want!

Now mold the balls by rolling about 2 tbsp worth into the palm of your hands. As your hands get stickier, run a little water over them and that will keep it from sticking onto your hands as you form the bites. 

I like to keep these refridgerated as they hold together better when cold! They’ll keep for 5-7 days in the fridge, but closer to 3-4 days at room temp. 


A few notes: 

If you choose agave (vegan) then it will be a little sweeter, and you might need a little less of it as it is a little runnier than honey. 

Feel free to add other ingredients too! Maybe carob nibs, or other dried fruit? Or even chocolate protein powder! All good options 🙂 


Health & Fitness

THE GOODNESS IN GREEN SMOOTHIES

I am a firm believer that you are what you eat. So that must mean I’m green, high in iron, calcium and vitamin C? I’m good with that! 


IMG_2179.jpeg


I got into the “green smoothie” trend five years ago when everyone in my family made a face when they saw the color of what I was drinking. Now, they’re the ones telling me what kind of smoothie they made for their breakfast. This is a trend I am happy to have everyone take part in! I mean, how can you not? They’re delicious, portable, and PACKED with vitamins and nutrients that help you feel your best. 

I have never done the meal replacement shakes that you mix with water in one of those shaker bottles. I tried one once, and that was it. It didn’t taste good, and I would much rather drink some fruits and vegetables with an added protein powder that I enjoy! These days people’s biggest issue with eating healthy is that they don’t have the time to prepare or find the right things to eat. Well, you can’t get any quicker than a blender. And most of them have smoothie settings these days, so one push of the button and you can still multitask while your meal is being prepared. There you go! Problem solved. 

But let’s get back to the good stuff, literally. All the good stuff that you can find in most of these smoothie recipes. When you go the “green” way, you’re likely opting for spinach or kale. Those dark leafy greens are packed with iron, fiber, antioxidants, vitamin C and vitamin K. I know! So much good stuff! My usual fruit accompaniments are: mango, pineapple or banana. I find that the flavor of those fruits balance the taste of the spinach and kale. But be careful if you’re opting for frozen fruit. Make sure to look and make sure there is zero added sugar. Fruit already has a good amount of natural sugar, so you don’t want to ruin a perfectly good recipe by choosing the wrong bag of frozen fruit. 

Another popular trend these days are Acai Bowls. And they’re delish! But you can also make them as smoothies at home. The reason Acai is known as a health food is the fact that this berry is jam-packed with antioxidants, vitamins A, C, and E as well as healthy fats like omega fatty acids (omega-3, -6, -9, stuff like that :-D). Plus, it tastes good! There are tons of great Acai powders on the market, but I have found an amazing Acai puree that I usually find at Whole Foods. It’s by Sambazon and they have a few different varieties, which makes these smoothies even quicker to make. Other things you can add with this puree or the flavor of Acai? I love: cherries, blueberries, raspberries plus some banana. Talk about a whop of antioxidants! 


IMG_2180.jpeg


A lot of people ask what liquids I use to blend my smoothies. Which is sometimes a forgotten ingredient in your smoothies and can make a huge different. I always tell people to opt out of the juice choice. By using juice alone, you could put a days worth of sugar into just one smoothie, and taking your taste buds down the sweet-tooth path for the rest of the day. My top two choices that I ALWAYS have in the house are unsweetened almond milk and coconut water. You can experiment with other milks like cashew milk, soy milk, or whatever you find tastes best and suits your digestive system. But there are so many good ones on the market you are bound to find the perfect match! I use almond milk for heavier recipes and ones that I want to taste a little “creamier”. I will use coconut water for smoothies that I want to taste a little sweeter and lighter. 

Now, this isn’t to say that I NEVER use juice in my smoothies, but sparingly. In my green smoothies that have pineapple or mango, I put a quick shot of pineapple juice in there, just for an extra little taste. In my acai or berry smoothies? I add a little pomegranate juice. Again, not a lot, no more than about 1/4 cup. And I always opt for the organic juices. Less preservatives, less added sugar, and more likely to come from the actual fruit itself! 

Now, last but not least: the protein. Don’t forget the protein! Having a healthy balance of protein to fat is a key factor to your diet as a whole, and in these smoothies it’s just as important. Without the protein you end up with a drink heavier in sugar, carbs, and fat. Now, they’re all healthy sugars, carbs, and fats, but you need the protein to build and repair tissues and muscles. My choice is always EBOOST. It is grass-fed whey, added probiotics and digestive enzymes, no artificial flavors, and no added sugar. Plus, IT’S DELICIOUS! Seriously, this protein powder is not the kind that will ruin your smoothie the second you add it. Because really, who wants to drink chalk? 


IMG_2178.jpeg


Now, let’s get to blending! 


GO-TO GREENS

1 cup spinach 

1/2 cup kale 

1/2 cucumber 

1/2 green apple 

1/2 cup frozen pineapple 

Wheatgrass – I get frozen wheatgrass shots from Whole foods and use one in this smoothie. You can find them with the frozen fruits and vegetables. 

Unsweetened Almond Milk 

a dash of pineapple juice 

1 scoop EBOOST Vanilla Prime Protein Powder


ACAI+CHERRY JUBILEE

1/2 cup frozen cherries

1/4 cup frozen red grapes 

1/4 cup blueberries 

1 packet of Sambazon Acai Puree 

Unsweetened Almond Milk 

splash of pomegranate juice 

1 scoop EBOOST Chocolate Prime Protein Powder 


MANGO TROPICAL SMOOTHIE 

1/2 cup frozen mango 

1/2 cup frozen peaches 

1/2 peeled cucumber 

2 pitted dates 

Unsweetened Almond Milk 

splash of pineapple juice

1 scoop EBOOST Vanilla Prime Protein Powder

*I also like to put a pinch of Camu Powder in this one. Camu is packed with more natural Vitamin C than any other fruit on the planet :-O 


the hydrator

1 cup frozen watermelon 

1/2 peeled cucumber 

1/4 cup strawberries 

2 tbsp chia seeds 

Coconut Water 


THE SUPER GREENS

1 cup kale 

1 stalk celery 

1/2 tsp fresh grated ginger 

the juice from 1/2 lemon 

1/2 green apple 

Coconut Water 

Health & Fitness

HEALTH-NUT’S KITCHEN SINK COOKIE

I’m a baker. 

I love to bake! I love to cook as well, but I have always chosen baking over cooking. In high school I would bake the cookies from my little Williams Sonoma cookbook that was only cookies. Mexican Wedding Cookies, Raspberry Jam Thumbprint cookies, Apricot Rugelach, ya… I was good!

So when I endeavored to be more healthy, I enjoyed the challenge of finding baking alternatives. Still having those little sweet nuggets every now and then, but that are still healthy and in line with my diet and way of life. 

Enter, these guys. 


IMG_0369.JPG


I love having little cookies around. To be honest I usually replace my breakfast oatmeal with a green smoothie and one of these guys or another recipe that I enjoy making. They’re an amazing packed snack for on the go, or even as a dessert alternative if you’re trying to kick that sugar-habit. 

By ‘kitchen-sink’, not only do I mean that there are a TON of things in this cookie (i’m pretty sure everything in my pantry), but you can also make your own kitchen sink! I don’t know if that’s a saying, but I’m going to go with it :-D. Meaning, you can make these cookies all your own! Use a different sugar, find a seed that you prefer over pumpkin seeds, use a different sweetener like honey, or maybe add some dried fruit? Hmmm, I’m getting ideas! 

Have fun with this recipe! Make this one a few times to perfect it, then have fun! Use your pantry for inspiration. Odds are you have some hidden goodies in there somewhere 😀  


HEALTHY KITCHEN SINK COOKIE

Serves || 12 – 15 cookies 


Dry Ingredients

1 cup gluten-free oat flour, or processed oats into flour

1/2 cup almond meal or almond flour

1/2 cup gluten-free rolled oats

1/2 cup thinly sliced almonds

1/4 cup sugar of choice (I used date sugar) 

1/4 cup shredded unsweetened coconut

1/4 cup carob nibs

1/4 cup pumpkin seeds (or seeds of your choice)

2 tablespoons chia seeds

1 teaspoon cinnamon

1/2 tsp fine grain sea salt

1/2 tsp baking powder

1/2 tsp baking soda


Wet Ingredients

1 tablespoon ground flax + 2 tablespoons water, mixed together

1/4 cup “drippy” raw almond butter (or other all-natural nut butter)

1/4 cup coconut oil, melted

1/4 cup sweetener of choice (I used agave nectar) 

1 tsp vanilla


First, combine the flax meal and the water to make your “flax egg”. Then preheat the oven to 350 degrees while you are making the cookies. 

Combine all of the wet ingredients together in a large bowl. 

In a separate small – medium sized bowl, combine all the wet ingredients until thoroughly mixed. 

Add the wet mixture bowl into the dry ingredients and combine until the flour is no longer visible. It might take a little elbow grease since this dough is of a rather sticky nature! That’s a good sign! It means they will be nice and chewy when they are done baking. *If you find that you just don’t have enough wet ingredients for some reason, and it isn’t blending well enough. Maybe add a tablespoon of almond milk one by one while stirring in between until everything is well mixed. 

Spoon a handful of the mixture onto the prepared cookie sheet. You can do this either with a parchment paper, Silpat, or light cooking oil. I made mine fairly large so it only made 12 cookies but if you make them a tad smaller you could get as many as 15. Or even better? Make them bite size and you will get a solid 24 cookies out of this recipe! Great for little kiddo’s on the go 🙂 

Bake at 350 for 13 – 15 minutes. Time will vary depending on the size, but my 12 large cookies cooked in a quick 13 minutes. Let them cool before enjoying, but you’re going to want to devour them when you do! 


IMG_0370.JPG


Health & Fitness

PROTEIN WAFFLES

clean, sugar free, protein packed and delish! 


IMG_7580.jpg


I looooove breakfast. Love love love love love! And I find that since it’s my biggest weakness, it’s the times that I am likely to ruin the rest of my day! But I turned that frown upside down and made these clean and healthy waffles! 

A huge part of having a healthy breakfast is protein. Many times the problem with having a bagel, or even healthy oatmeal is that while you may think you’re eating a healthy breakfast, it is just carbs! You’re not getting all the nutrients you need to keep you full through the day, as well as giving your body the kick it needs to stay strong throughout the day. 


IMG_7579.jpg


Not only do these waffles solve that problem, but they still taste great! I used EBoost vanilla Prime Protein Powder and the taste is always great. Even in my smoothies :-D. So the taste will change depending on what protein powder you use. I also love Tera’s Whey which you can find at Whole Foods and sometimes Target!

This recipe makes a big bath! 8 medium squares which serves about 4 (normal) people. Or if you’re my husband… 2 sittings. But if you’re like me! You can make the batch on Sunday, then store the rest in the freezer to have for a quick and healthy breakfast during the week! 


IMG_7578.jpg


PROTEIN WAFFLES

// makes 8 large squares // 

4 egg whites 

2 cups oat flour

2 tablespoons flaxseed meal 

3/4 cup protein powder 

1/4 cup rolled oats 

1 teaspoon cinnamon

1 teaspoon baking powder 

1 teaspoon vanilla extract 

1 1/2 cups unsweetened vanilla almond milk 

*I sometimes top these waffles with sugar free maple syrup and/or Siggi’s vanilla yogurt for another hit of protein and flavor. 


Prep your waffle iron before starting to mix the ingredients. I put mine on level 4 of 7 and it made cooked them perfectly. 

In a medium bowl, whisk the egg whites until a stiff peak forms. Meanwhile in another medium bowl combine the dry ingredients. Add in the almond milk and vanilla extract until completely combined. 

Gently fold in the egg whites until practically combined. Don’t over mix or mix too hard as that will collapse the egg whites which is what gives these waffles their volume. 

Gently spoon the batter into the waffle iron, careful not to overfill, and allow to cook. Repeat with the rest of the batter, then serve warm and enjoy 🙂 


Health & Fitness

BEYOND JUICE RAW NUGGETS

These are a marvel!


IMG_7040.JPG


And a marvel inspired by one of my favorites spots in Michigan. There are a few locations of Beyond Juice, two right down the street from where we live and I go there all the time! I first went for their fresh juices and amazing smoothies. Then I tried their awesome food, which inspired this awesome recipe. 

Let’s be honest, we are human! Sometimes we need a little something sweet. And I will never buy those things at the store that scream “vegan” or “sugar free” or anything else that is just a euphemism for “fake” and “unknown products” or other things that I can’t even pronounce. And please follow my lead there. Just because something is vegan doesn’t mean that it is healthy!! There is still the same amount of sugar usually, and other products that are fake and unknown just to make the recipe edible. 


IMG_7038.JPG


All you need is a food processor to make these, so clean up time is super quick! As the ingredients are processed together, don’t worry that it doesn’t look like it will congeal. It shouldn’t look like cookie dough or any other normal cookie “dough” that you are used to. It should still look a little crumbly, because as you form the balls in your hands, the moisture of the ingredients will help form the nuggets. 

Now, if you do start to form the nuggets in your hands, and the ingredients crumble apart, no matter how tightly you mold them, add a little more agave! All you’ll need is another pinch or two. You don’t want the combination to be too moist because then they’ll be super sticky! And if you have the other problem? Too wet? Add some more oats and raw cashews. Or… if you’re of the mind… add some protein powder! It’s a great way to boost the nutrients of these already awesome nuggets.  


IMG_7039.JPG


BEYOND JUICE RAW NUGGETS

// makes 12-15 small nuggets//

15 medium medjool dates, pitted

1/2 cup raw unsalted cashews 

1-2 tablespoons of shredded coconut

1/2 cup gluten free rolled oats 

1/2 tsp vanilla extract 

1 tsp ground cinnamon 

1 tablespoon of dairy free chocolate chips, *plus more for garnish 

pinch of salt 

1 tablespoon almond butter 


Make sure all of the medjools are pitted before proceeding! Otherwise someone will bite into one of these nuggets and get an unpleasant surprise :-O 

Once you’ve checked that box, put all of the ingredients in a food process, and pulse for 15 seconds at a time until you have reached desired consistency. Like I said above, it won’t be a totally smooth “dough” like you are used to. It will be almost completely processed but appear a little crumbly. 

Using your hands, take about 1-2 tablespoons of the mixture into your hands and pat together and mold in your palms to form a ball. If you want to make them the same way that the juice bar does, lightly push the molded ball onto a piece of parchment and use your finger to form a dent in the top of the nugget. Then fill the dent with your dairy free chocolate chips! 


Health & Fitness

SKINNY BANANA BLUEBERRY PANCAKES

Pancakes don’t have to be unhealthy! 


IMG_0220.JPG


Pancakes get a bad rep for being a glutenous brunch cheat meal. I mean, the word ‘cake’ is in the name! But what you get at iHop and at your favorite breakfast spot doesn’t have to be the only time you get to eat pancakes during the week! I truly believe that you can make anything healthy, and this recipe proves it. 

The biggest issue with most pancake plates is not only the maple syrup that people use (in buckets) to garnish them, but also the amount of sugar! Restaurants use sugar to make the pancakes taste good and even sometimes they whip heavy cream to make the pancakes light and fluffy! I mean… totally unnecessary. 

My recipe uses natural sweets like bananas, and instead of cream or anything super heavy I use a healthy and low-in-sugar yogurt that (BOOM) is also high in protein. Gluten-conscious? I use gluten free oats and oat flour. So when you look at the contents, it’s basically a bowl of oatmeal. No, really. It’s super close! 


IMG_0219.JPG


This recipe gives you healthy carbs in the fruit and oat flours, which will give you a great source of energy to get you through the morning. Since it has a bit more protein? It’ll keep you full throughout that morning too! Want to give it a little extra boost? Add a scoop of your favorite protein powder to make it a great post-workout breakfast. 

So, yes, you can have your pancake and eat it too. And it won’t ruin your diet for the week, and it won’t leave you craving more sweet and unhealthy foods throughout the day. 

Just make me a promise? That you won’t douse these in maple syrup??


IMG_0222.JPG


SKINNY BANANA BLUEBERRY PANCAKES

// serves 2 people //

1 banana 

2 egg whites

1/2 tsp vanilla extract 

1/4 cup siggi’s vanilla yogurt 

1/2 cup rolled oats 

1/2 cup oat flour

1/4 tsp baking soda 

1 cup blueberries


Mash the banana and whisk in the egg whites, vanilla extract. Add in the yogurt until completely combined 

Mix together all of the dry ingredients and then add in the banana mixture. Once almost combined, mix in the blueberries. 

These make about 5-6 pancakes that are medium – large in size. You’ll know when they are done cooking on one side by the bubbles on the side